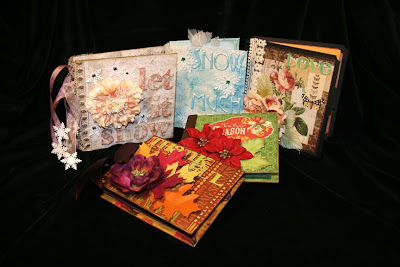
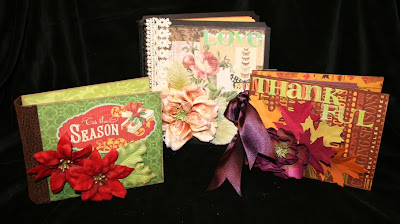
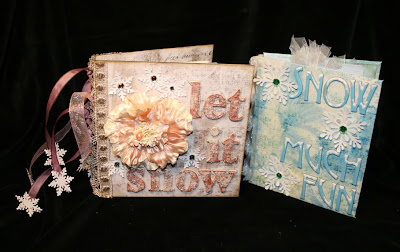
…I designed a new envelope mini album!! The Shaped Hinge Envelope Mini Album!
Here’s what you need to make your own:
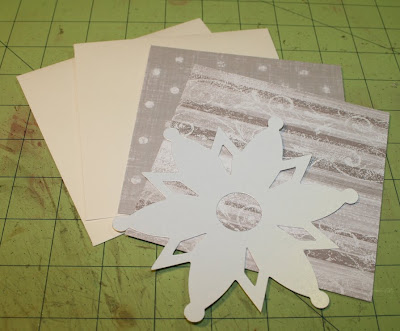
Envelopes. Any size or shape you want. I used 6 pages for eachof my mii’s
Paper. You can use any size or style that suits what you want your mini to look like. You will also need some coordinating solid color cardstock.
You will also need a “shape” to act as the hinge part. For this sample I am using a Sizzix Snowflake die. You could also cut a shape from an electronic cutter.
Start by sealing your envelopes and trimming one edge open on all envelopes. Cut patterned paper slightly smaller than your envelope and adhere to both sides of the envelopes. Cut your hinge shapes, making 1 more than the number of pages you have.
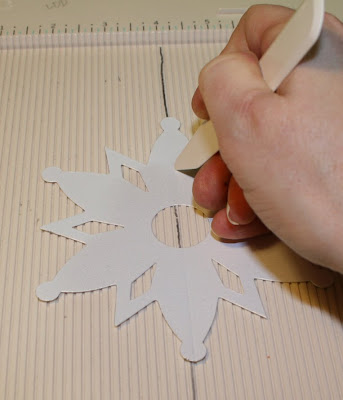
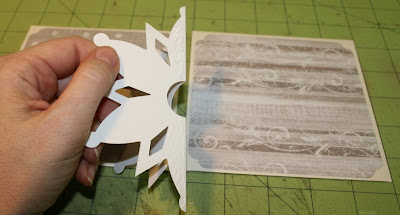
Score and fold your hinge shapes. If using an assymetrical shape, try to score it so that each side is of similar size.
Apply glue to the folded edge of hinge shape. Extend glue to a little more than 1/4″ from fold but less than 1/2″ from fold.
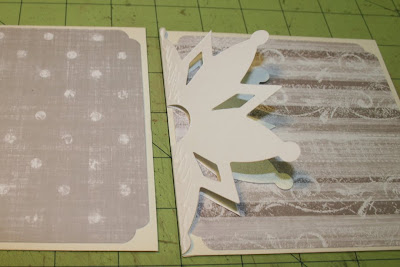
Attach hinge shape to envelope, aligning fold of shape with edge of envelope.
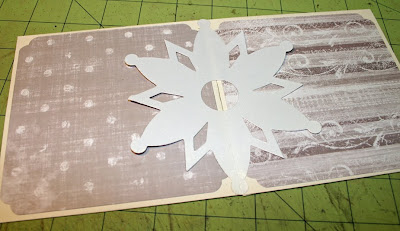
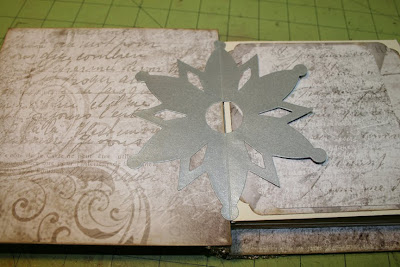
Repeat for other side of hinge shape. Follow this sequence for all pages.
Attach chipboard covers in a similar fashion. Apply glue to ENTIRE half of hinge shape when attaching to cover.
Cover spine with ribbon, lace or fabric. Alternately, attach ribbon under embellishments and tie along spine.
These are addictive to make! They can be made suitable for almost any occasion. Have fun! Don’t forget to check out the Youtube video. CLICK HERE to go directly to the video.
See you on Wednesday!
Laura




This is absolutely wonderful! I have loved all of your tag books and have made several since I found your site. Thank you for posting this and I hope everyone is doing better – you sure have had your hands full!
Debbie
Oh this is a wonderful Mini album
You make the most wonderful projects!
thank you Deni
OMGooshness… am I glad I found this beautiful blog Laura… what a wonderfully creative and inspirational lady!! There is so much happening here I’ll be lost here for a little bit… hehe but hope to catch up with you on UStream one day soon… (just have to figure out the time zones btn AU & you… LOL)
before I forget……. what a beautiful idea you’ve created!! FANTABULOUS! TFS your beautiful work… 🙂
take care – have a beautiful day filled with creativity & inspiration
hugs
Darlene
Cute!
These are so Awesome, Laura! You make it look so easy! Thanks for sharing all your wonderful creations.
wow love your first project thanks for sharing with us
It is amazing how you can come up with these great projects! You definetely must have Time management under control ! As I always say, When I grow up, I want to be just like you ! LOL Thank you Laura ! From the bottom of my heart ! All the best ! Olga
Superbe vos albums, vous avez un talent fou, j’adore, merci beaucoup de partager avec nous votre immense talent, c’est apprécié.
Great! beautiful albums, I love your work and thank so much for sharing your talent with us. This is appreciated. Bye..bye….and good day.
As always you hooked me. I have a batch of envelopes that will be transformed ala “following the paper trail. Thanks soooo very much for sharing.
Beautiful Laura and really quite easy to make….although I am sure I still won’t be able to make 4 in one afternoon like you did!…..great way to start the 12 days of Xmas….
Love your mini-books and thanks for the great utube videos.
Wow….love this idea. thanks for sharing and I enjoyed watching the video as it helps me learn.
Love, love, love these mini’s. Going to make up some as Xmas gifts. Thanks for sharing!
Thankyou so much for your generosity in sharing these. Yours are absolutely gorgeous and I look forward to making one.
OMGOSH Laura!!!!! Awesome minis!!!!!
hugs
Brenda
Love them… Thanks!
They are just sooo cute and fun!! Thanks again for sharing your gift with us!
I’m so glad I found your blog. You make such beautiful things!! Thanks for sharing them with us! Going to make some great Christmas gifts!!
Happy to see that the envelope minis are still flowing in that creative mind of yours 🙂 Love em!
You are absolutely amazing with all your ideas. Those minis are GORGEOUS!
Great Job Laura must get out some envelopes.
Can’t wait to see other projects.
Wonderful project and thank you for your directions and genorosity.
Hi Laura,
So so darn cute and quick to make.
I just love all of the ones that you showed in the demo. You are such a talented lady.
God really blessed us with you. I am going to make these for my family for Christmas gifts.
One of these and a plate of homemade cookies and fudge should be perfect.
I am starting them this weekend.
About the glue…is it the quick adheasive you usually use or is it the quick drying tacky glue from the same company?
Can’t wait to see the next project. This is going to be so much fun.
God bless you and your family. You are all in my prayers.
hugs,
angelbug56
Cheryl
The glue I used on these and that I use on many of my projects is Scotch Quick Dry Adhesive.
Laura
These are so cute!! Saw the Utube broadcast last night and started looking for envelopes this morning. What a great quick project for the holidays :O)
Laura, these envie mini are the cutest. I can see where they become a “disease”. You are the best .And I can’t wait to see what’s coming. Thanks so much for all of your inspiration.
Laura, these are simply gorgeous! It’s also given me an idea for binding a toilet roll mini-album I’m thinking of making – I haven’t yet got a binding machine ans wanted to do something that would look attractive.
Laura, I am not good with size what are the sizes for the Let it snow book? Thanks Jenn
Great project!!! Can’t wait to make some of these!!! Thanks so much for sharing all your talent! You are my inspiration!!
Giggles and hugs!
Starjenn,
The envies are 5 x5 and the cover papers are 4 3/4″ square.
Laura,
I just did my first book but I cant get the paper to stay on the Envelope do I use the same Scotch Quick Dry Adhesive?
Hi Laura! Looks like a lot of fun. So cute and nice and easy. Thanks for the project!
Cristal
http://www.busycreating . com
Laura…
These are so dang cute that I had to make one for each person at their place setting for Thanksgiving! I am going to take a family photo and print one for each persons little booklet. I am suppose to be focusing on Christmas but I could not help myself…LOL
Betty Mae
Starjenn
I use my ATG or an adhesive tape runner to attach the paper to the envies.
girlfriend, awesome! i made two of these 2nite! and i love them. of course, being a follower, i had plenty of envelopes to pick from, and both books turned out awesome, thank you for sharing again! see u soon on ustream! xo
I LOVE it. What can I say Laura, you are a genius. I can’t wait to get started on my own.
Stephanie
Just beautiful. My daughter and I both made one. You amaze me with your talent and the speed at which you can crank these out! Four in one day! It takes me that long to decide on what papers to use! LOL
Laura, just love this project. How much of the envelope do you cut off and what size is the cover? Thanks for sharing.