I’m not sure when the first day of Christmas is officially, but TODAY is the first day of Christmas here on my blog!I will upload a new project, idea, or tip each day. On the 12th Day of Christmas (actually it will be on December 18th) I will be giving away a one-of-a-kind Mini made especially for this event! To be entered all you need to do is subscribe to my blog and leave a comment that you subscribed. If you already subscribe, let me know in your comment that you are a subscriber….that’s it.
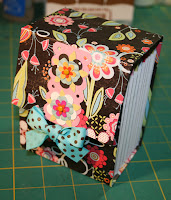
This first project is a Gingerbread House Recipe Box!

It would make a great gift for the cooks in your life or a wonderful hostess gift. It can hold either recipe cards or photo’s.The little box a the end is one the the first mini’s I made. I saw something like it and figured out my own dimensions. I will have a video up on Youtube (http://followthepapertrail.youtube.com) showing this project and will have kits up on Etsy (http://followthepapertrail.etsy.com) to make one just like mine by tomorrow.
 To make this Cover, you will need chipboard cut to the sizes shown, a 12″ x 12″ paper for the outside, cut into two 6″ x 12″ pieces. You will also need a sheet of 12″ x12″ paper for the inside cover, cut into two 4 1/2″ x 12″ pieces.
 Attach chipboard to wrong side of patterned paper. Place seams as shown in photo. Make a “shim” with two thicknesses of chipboard. Use this shim to make a consistent space between chip pieces.
Trim corners about an 1/8″ from corner at about a 45 degree angle.
Gently roll paper over edge of chipboard and glue in place.
Fold cover towards inside, scoring if necessary
Place inside paper on chip board to cover edges of outside paper, seaming as shown in photo. Adhere to chipboard.
Gently fold cover towards inside again, scoring if needed.
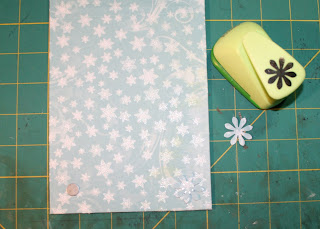
Attach magnets (or velcro dots) as shown. I have had problems with the magnets coming unglued in the past. I like to punch a small flower to cover over the magnet to help attach it more firmly without affecting it’s magnetism. I like to use Glossy Accents to attach the magnet and flower. Repeat on the outside cover as well.
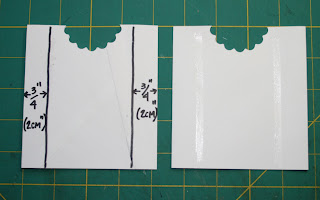
Seal six #10 envelopes closed. Trim approximately 1/4 off ends of envelopes and cut in half.
Use a circle or scalloped punch to cut out “finger” pulls from envelopes.
Run a strip of adhesive 3/4″ +/- from each side. Attach all envelopes together.
I use a stronger adhesive such as Terrifically Tacky tape to affix the envelpope “group” to the coverered chip board cover. Attach approcimately 1/2″ to 3/4″ above bottom. Attach to front first then to back of “box”.
The cover is ready to decorate!
 To make the “roof”, trim a 5″ x 5″ piece of chip board as shown. cover with paper and attach to upper flap. Add dimensional paint to simulate snow on the roof line and windows. Add glitter glue (Stickles) to snow and tree.


Make Recipe cards or photo matt’s from solid or pattern paper. I used 4″ x 6″ for the cards and 3″ x 4″ for the photo matt.
Have fun with this project and make sure to check out the video on Youtube!
Happy Holidays!!
Laura










Cute, Cute, Cute !!! I just subscribed to your blog. Can’t wait to see all that you have planned for your 12 days of Christmas!
Lexi
Hi Laura I already am a subscriber to your blog. You are such a great inspiration! Can’t wait for all the projects! Happy Holidays!
Cara
What a great project! I’ll be making this one…can’t wait to see the next 11 days!
(I already subscribe to your blog through google reader)
Heather
I’ve never commented on your blog, I just started following it. But, I have watch ALL your You Tubes. Can I do an intership with you. I’ll do loundry, floors, windows what ever. You have such ideas!!! Laura, How do you come up with this stuff??? LOVE THIS ONE.
I THOUGHT MARLENE WAS SO FUNNY! 🙂 LAURA, EVER SINCE I LEARNED ABOUT YOU I HAVE BEEN A FOLLOWER AND I AM SO GREATFUL FOR ALL YOUR INSPIRATION. THANK YOU!
I *LOVE* *HEART* this idea Laura! I have seen this type accordian fold before and never knew how it was done so thank you!
and you’re right, your blog so you can say when the 12 days of Christmas start! lol!
*gina*
Laura…I’m loving this! So, so cute! You are amazing…thanks for the u-tube clip on the gingerbread house…
I’m fixing to scraplift the dimensions right now…lol
(hugs) Melissa
Hi Laura,
Love this idea, Im already a subscriber to your Blog. I love the 12 Days to Christmas idea, neat project, going to start mine this afternoon. Thanks for sharing.
Arohanui Xxxx
This is an awesome box. Your projects are beautiful. I have subscribed to your blog. Thanks for sharing
This comment has been removed by the author.
Laura,
I love this project.
Thanks for sharing.
I am already subscriber.
Marcia
so adorable….been a subscriber and love all of your creative flow…TFS
i’m a subscriber! love your creations! thanks for sharing :)!
Laura, this is so cute! I love this idea and it would make an awesome gift!! I plan on making one as soon as I can. I have been a follower and I look forward to seeing more of your creations!!
TFS!!
Regan
“It’s a Marshmallow World” with you Laura!
I love you Smore much! You are absolutely amazing! Hugz- Joyce
Hi Laura, i’ve subscribed already, this house is soo pretty! thankyou for sharing the instructions! x
This is wey sweet, I to made one a while back from my own measurement’s for my ATC’s…
I have now subscribed to your blog and look forward to seeing your 12 days of christmas and all your other lovelies you make…
Keep up the GREAT work…
Hi Laura I am already an avid subscriber/follower
I am in love with your gingerbread house mini recipe box. wow super adorable its the cutest thing ever. and doesn’t it take you right back to childhood..mmm the days when you udes to dream of a house made of yummy sweetness. thank you so much for the step by step its truly invaluable
This is one of the coolest projects I have seen this winter! Thanks so much for sharing!
What a great project and adaptable for so many themes
You are so creative! I love this! Right up my alley. I love making books and boxes but unlike you, never seem to be able to think outside that box! LOL
Great project! Lots of ideas dancing in my head!
Thank you so much for sharing this project! It’s a wonderful gift idea! Looking forward to what’s next!…Nancy
Love your projects, thank you so much for sharing this with us.
You are one talented lady. Thank you so very much for sharing your project ideas. Can’t wait to see the other 11.
Mary from Michigan
Just became a subscriber. Please, please pick me Miss Laura!! ~ Laura from Belgium
I love it – I will put pictures of mine in my blogg in a day or two 😉
Thanks for sharing 😉
Love it! Wow, again I say you are so talented! I can’t wait for the next 11 days!! I am now a follower on your blog! I don’t know why it has taken me this long to become one!
Hi Laura. .I am a huge fan of yours. Your talent is incredible. I am now a follower of your blog.
Oh my other comment didnt seem to be posted!
I’m now a follower on your blog (I think, new to blogspot.com!)
Followed you on youtube since your first vid, love em so much.
Already a subscriber! Super Fabulous 1st project I just Love it! Dawn
Laura, i watch ALL your youtube videos!! you ideas and projects are ALWAYS so GREAT!! I especially love this one! My daughter saw the gingerbread house and said “mommy can we make one to take to my gymnastics teacher”…lol…thanks for the inspiration!! I love it!! ( i subscribed to your blog)
Jessica (www.distressedlove.blogspot.com)
already a subscriber, love this super cute project 🙂
This is so super aawesome!! It looks like it is fairly simple to follow, I’m gonna have to try this one out.
Saw this on the beach, and of course I’m a follower of your blog and your you tube channel.
Looking forward to your 12 days of Christmas.
Thanks for sharing.
~Jill
A very excited friend just instant-messaged me links to your “Twelve Days of CHRISTmas” YouTube video AND your blog!!!
OOOOH, MY GOODNESS!!! No wonder, she was SO excited!!!
I have just subscribed to your blog and anticipate spending MANY evenings sipping hot chocolate and viewing your tutorials!!! (Wrapping presents can WAIT, right?!!)
I’m a subscriber and also love watching your youTube videos. Your projects are always so creative.
I am blog and Youtube subscriber!!! Great gingerbread mini album!! LOVE IT!!!
Now this is a super cute idea.
Hi Laura,
I just signed up to follow your blog. I’ve been watching you on YouTube for a while. Love your work!
Smiles, Jeannie
You are so talented!
Hi Laura!
I’m a subscriber and that project is so dog-gone cute!
Thanks for sharing it.
{Alita}
Hi Laura! I just subscribed to your blog! I LOVE your Gingerbread house recipe box. Thank you so much for sharing your work.
Hi Laura, I just love this recipe box… thank u so much for sharing all ur wonderful ideas…
kissindawind (Anna)
Hi Laura I just subscribed to your blog. I’m already a subscriber to your videos. I often listen to you videos while working. I always catch great tips and you have a great voice. Thanks for being so generous with your creativity. Merry Christmas!
I just subscribed to your blog. I found you on youtube on a tutorial you were doing on your flowers. You are brilliant. I left comment on day two but forgot to tell you I subscribed to your blog. I look so forward to seeing what you will come up with each day!
I love your videos such creativity. You do think out of the scrapbooking (box) lol. I hope you keep up the great videos , tips , ideas. I look foward to your videos to come. Happy Holidays to you and your family.
Hi Laura..Gingerbread House Mini Recipe Album brought to life..what I needed to put my Holiday Recipes in. Thanks so much for showing all of us how to make the coolest projects. I am so excited about your 12 Days of Christmas. Looking forward to creating.Merry Christmas. Sheryl (samhearts@cox.net)
I am now following you….please don’t be scared I’m just blog following ;o)
Very cute recipe box, I love it! TFS! Hugs, Mary (2scrapalot.blogspot.com)
I am definitely a subscriber to your blog and your youtube. I am constantly inspired by seeing not only your lovely designs, but also your productivity. I don’t know how you do it! (but keep it up 🙂 Thx! (oh and it’s cold here in Portland too, but a friend told me where she’s at in Nevada it was 20 below at 8 am as she was WALKING to work. 20 below. That’s crazy cold.)
im a subscriber! ur way 2 creative! thanks 4 all the ideas!
I’ve made 2 of these already. I didn’t make mine into gingerbread houses but they turned out great. One is for a newly wed girl that I work with that is always asking for recipes. This is going to be great.
Thank you!
Malisa
Hey Laura, Gosh I just love what you get up too. Very cool projects. My fav has to be the butterflies, gotta give them a go but trying to think of what else I could use instead of the tim holtz fragments. Havent been able to find those. Awesome job Laura…
Thanks heaps
Shonz
love this album. thanks for sharing.
I love this project and I love your instructions. I just became a folower on your blog but I’ve been watching you videos on youtube for a while, love them all. x Viv
I’m a follower Love all your projects ;o) Happy Holidays! to all
I’m a follower. I love this idea. How do you come up with all of these adorable projects? Great work.
This is awesome and I will so be Craftjacking!!
ANd just to let you know…
the 12 days of Christmas are NOT the days leading up to Christmas Day. They are actually the 12 days FOLLOWING Christmas until Jan 5 ( epiphany). Just your little bit of learning for the day 😀
~M
Wow, what a terrific project. I found you thanks to Kathy Orta who I also follow. I love your work and have subscribed to your blog. You must be sooo proud of your work.
Merry Christmas!!
Hello Laura, the recipe box is great, I am off to make 4 of them right now for Christmas gifts that I need the next two weekends.
Would you please share with me how you printed the recipe cards? Did you do this on a specific computer program? I am not very talented when it comes to designing word are on the computer but would love to know how to do it so that I can include the cards like yours in my boxes.
Thanks for sharing!
Christi
fillhardfarm@sbcglobal.net
I just subscribed to your blog; love this project and all of the 12 days of Christmas projects, can’t wait to get started. I’ve also watched most of your YouTube video, you do such get work, thanks for sharing with all of us.
Wow just saw your video on you tube and love thisproject. Can’t believe I missed it ;-( I host a cookie exchange every year and this will be a great project! Love your work
Anne
Greetings! A plotrjasajushchy album. And a master class! Thanks you huge. And still I became 3900 reader of your blog.
Hi Laura,
You are such an inspiration!! I have just started following you. I found you via youtube, and I just can’t get enough!!
I am sure that you know how special family recipes are… I am a baker and have been promising my niece a book of my recipes for some time, but could never come up with a great idea for putting it together. I have found it now!! Thank you so much!!