
A bit late getting this up….sorry ’bout that! My son has needed some extra Mom time so I am running behind….but family comes first!
These tiles and butterflies are made from a very common material….FUN FOAM! You know, the stuff in the kids crafts area! I comes in a squillion colors and it’s CHEAP!

For this project I have used two different techniques with the foam. The first is heat embossed with rubber stamps.
Cut the foam into small squares (I used 2″ squares). Evenly heat with a a heat gun and immediately stamp with a stamp. Deeper cut stamps without fine detail work best.


After stamping, lightly rub a metallic paint dauber over the raised areas

Affix the “tiles” to a chip board base, evenly spaced. Spray with Glimmer Mist (I used Irridescent Gold and Tarnished Brass) Let air dry.

Use 3-D paint as “grout” between tiles. This paint is very shiny, so I added fine glitter when the paint was still wet.


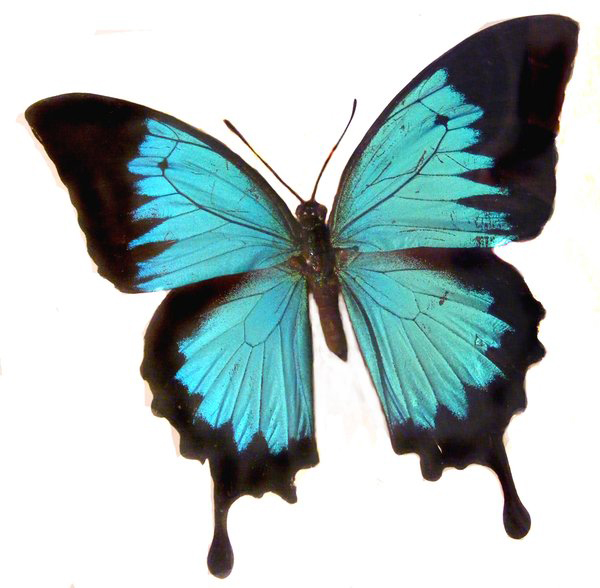
The Butterflies are made with a different technique… standard embossing with Tim Holtz Distress Powder.


Cut out the butterflies with sharp scissors and attach the butterflies to the tiled background in a random pattern.

This is a fun technique that I used years ago on a quilt project and thought it would work great for a lightweight mini album cover. Stay tuned next week for what’s going to happen INSIDE this mini!
Have a great week and a lovely Easter weekend….
Don’t forget to take time to PLAY!!!
Laura


this is such an awesome idea i bought some of the fun foam so i could diecut my cuttlebug dies and stick them to a block and use them as stamps so this is really steping it up, thank you Laura for yet another fantastical idea, Tracey in NZ 🙂
Hi Laura,
now i am definitely sure that you are a genius!
you do research, you experiment and you come up with something totally new, you are a real craft person. i just loved these two ideas, the tiles looked so perfect. thank you very much indeed for sharing all these marvelous ideas with us…
Very cute Laura and perfect for all that foam I have sitting around after all my Christmas crafting lol
Paula (also from NZ lol)
What a great foam technique, it looks great!
Great project, it looks beautiful.
xxx
Marlene
Now I have to run out and get some fun foam! Wonderful idea!
Thanks,
Michelle
This is such a great idea! would love to try it…what kind of foam do u use? would the foam backing that comes with stamps work? you know the ‘stamping surface’ thing? anyway..i love ur work laura u are the most talented i have seen on youtube. straight to the point and and excellent teacher..gonna try to find u on ETSY so i can stay posted on your kits! keep up all ur great tutorials and i look forward to seeing u on ustream! Absolutely luv ya gurl! lol take care ***Nichole
Very cool! You are one creative lady. Have a great Easter with your family. God bless you and yours.
Thanks!
Marisela
Oh my GOSH!!!! This technique is absolutely GORGEOUS!! Who would of thunk it! Only you Laura, I tell ya, you have the best ideas!!! I am going to have to try this!
Thanks for the AWESOMENESS of your talent, and this fantastic mini cover!!!!
Happy Easter!
Lisa Sturgill
As always I love what you have done. I tried to find the stamp in Australia without any luck. Do they still make it?
I saw one at the local Joann’s the other day. Not sure if it is online. Maybe check Stampendous website (if they have one)
love your work. you are truly an artist. Thanks for shareing your tutorials.
can’t stop looking at this – WOW! Thanks for continuing to share your artistic genius with us. Doris 🙂
Awesome work and a great idea, thank you for sharing
WOW! I’m in complete AWE! I have learned so much in the last half hour pouring over your blog and youtube videos…and I don’t consider myself a novice. You are my scrappy hero! {GRIN} I will be watching your blog, thank you so much for sharing your creative genius!